Wednesday, March 30, 2011

Essential: Adding Your Etsy Shop to Your Blog

Since I'm an amazingly brave girl, I almost simultaneously opened my Etsy shop and started writing my blog, all while chasing around a 14 month old baby boy all day. I don't know what possessed me to do this, maybe the monotony of my every day life, maybe I'm just crazy! Regardless, I'm learning a little bit every single day which is good. Today I learned how to add my Etsy shop to my blog. Go me! I'm not the most technologically savvy gal so if I can do it, you can too!

First, you will want to log in to your Etsy account. Once you are in your shop, (private, not public) go to the navigation bar on the left side of the page, scroll your little peepers all the way down.... NOW STOP! Right there where it says 'Etsy Mini,' in the Promote section. From here you just follow the simple directions for building your own mini Etsy shop inside your blog. How cool! As a big believer in the "Less is More" motto, I chose the 2 column, 2 row option.


Make sure you have selected from all three sections at the top. You know you haven't done this if a preview doesn't appear below. Once your preview appears, copy the code that shows below the preview.

Now you are through with Etsy. Go to your blogger account and open up the dashboard. You are going to go to design, then you click on "add a gadget" in the "add a gadget" section on your layout where you will want your shop featured. Once you click here, a pop-up will appear asking you what kind of gadget you want to add. Scroll down to HTML/JavaScript. Click on it. In the title you can put something like "My Etsy Shop" or the name of your shop. The contents section is where you will paste your code. After you paste it in your done! Well, almost... make sure that you save changes in the design section or all your hard work will disappear.


Look at you! You now have your very own Etsy Mini on your blog. Enjoy and may the sales fairies sprinkle you with sales dust from your blog. 

Thursday, March 24, 2011

Essential: Estate Sale Fun

I stumbled on an a-ma-zing estate sale today. The kind of estate sale that makes "pickers" like me happy all day. The kind where you look at stuff and say, "This is AWESOME!" then you look at the price tag and feel a little guilty about the deal you're getting. I picked up all this loot today. I'm not even going to say how much I spent on it all because you would be entirely too jealous and would maybe even quit following me ;)


This stuff is so cool! I might sell some in my Etsy shop... or I might just keep it all. You can look for it in my shop if you want.

http://www.etsy.com/shop/quirkyessentials?page=1

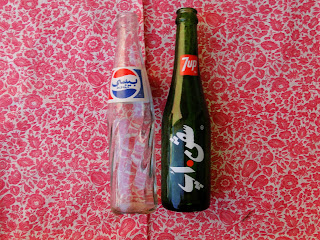
These old soda bottles are so cool. I'm not sure what language they are in though. The Pepsi bottle says 1941 United Kingdom on it.


My favorite treasure though, are these matchboxes. They are so stinkin' cute. What a great decorating piece! I got the rockin' vintage ashtray there too.


I almost think I got too lucky with this one. I may not even go out in search of treasure tomorrow... for fear that the estate sale gods have already given me too much today!

Wednesday, March 16, 2011

Essential: Flower Mementos

Last August, for our third wedding anniversary, my sweet husband sent me roses, daisies and wrote me a song! He's so cool. Anyway, I have tried many times to save flowers, i.e. drying roses, etc. They always just look like dead flowers, they collect dust, and I end up throwing them away months or years later. This time I decided to press my daisies in a big, thick book. Well, they have been in that big, thick book for 7 months now. I decided it was high time that I do something with them!

A few days ago, I lucked into this amazing yard sale and was able to pick up seven or eight frames for under three bucks. This is the frame I decided to use for my project.


It was definitely old. The old, fragile paper that was in it was brown from age around the edges. The frame actually could have been been used as is, but for the project I wanted it for, it needed some drama. So I gave it a few coats of black spray paint.

Then I hopped on over to graphicsfairy.blogspot.com. I cannot say enough about her page. It's awesome, everything is beautiful and best of all... ALL THE IMAGES ARE FREE! The only bad thing is you might possibly get lost for hours on end scouring all the beautiful images.

For this project, I was in search of a music sheet. I wanted to use a music sheet to serve as a reminder that my husband wrote me a song when I got the daisies. I printed off the music sheet, cut it to size and added my daisies. . .


It was alright, but a little crooked. On top of that I just thought it was still kinda boring. So I added a little dimension with another music sheet.


Ahhh, perfect. I really like this and I think the sheet on top of sheet gives it a little dimension.

Finally some dried flowers I can keep forever!

Any suggestions on other ways to keep dried flowers pretty forever?

Tuesday, March 8, 2011

QUIRKY: Old Brass Tea Cart

Well, I know nothing about tea carts but when I saw this at a thrift store the other day, I just had to have it! I traded the lady that worked there for a few things that I had... but didn't want. So it worked out just perfect for me! Tip: Don't be afraid to try to barter at thrift and antique stores. It never hurts to ask and a lot of times it works!


Here's my cart. I will spend about a decade polishing it! I'll post when it's real perdy =)


Sunday, March 6, 2011

QUIRKY: New Dresser

While running around a few estate sales the other day, I came across this small dresser. It looked sad to me =( like it needed a new life. I couldn't think of any reason I particularly needed it at the time but it was so ridiculously cheap that I bought it anyway.


It had this yucky faux wood contact paper on the top. Why do people do this?? I will never understand! Sure the wood underneath it was a little rough, but so much better than this.


Anyway, I knew I didn't want to spend much money on this project, seeing as I had no idea what I even planned on doing with it. So I went to Home Depot and bought some paint. Tip: If you don't want to spend a lot for paint and don't have your heart set on an exact color, look in the returned paint section at Home Depot or Lowe's. You don't want to go with the super cheap stuff believe me. For this project I lucked into a gallon of Behr's Premium Plus paint in "Chameleon" for $5.00. These cans usually run around $30.oo per gallon. If possible, I prefer to use Behr's Ultra Premium Plus because it has a built in primer which saves you a step. In this case, I really liked the color and it was a good deal so I went for it.

After getting home and removing the ugly contact paper and equally ugly hardware I then lightly sanded it. Since I didn't get the Ultra Premium paint, I went ahead and sprayed the whole thing with Kilz Primer. If you ever take on a project like this you will want to prime it to save future headaches and make your piece look great.


I decided to distress the dresser just a little bit. If you plan on distressing, apply a paste wax over the primer or if you are distressing more than just a little bit, you will want to use a contrasting color for the bottom layer. Wait 24 hours after painting and apply the paste wax just over the areas that you plan to distress. You only need to wait about an hour after applying the paste wax to paint your first coat of the outer layer. Wait at least 18 hours, paint your last coat and waa laa! After your last coat has dried, you can then distress. Since I only wanted to distress just a bit at the tops and bottoms of the drawers I used a fine 220 grit sandpaper and lightly sanded those areas. If you want a heavier distress, use several different grits.

Lastly, I screwed in the new hardware I bought on sale for a buck a knob at Hobby Lobby and was done. Of course it was so cute I found a spot for it =)


Tuesday, March 1, 2011

ESSENTIAL: Amazing First Birthday Party!


This January 26th marked a very special birthday for my baby boy Silas... his first! His stepsister Ella's 6th birthday is on January 24th. Naturally, we wanted to have a big party for the both of them. My job was to create a girl and boy themed party fit for a 6 and 1 year old.

This was no easy feat, but once I decided on a general theme everything just worked out. I knew something that they both loved and could agree on was Elmo! This guy for some reason has the ability to put a trance on small children! I also decided to throw cookie monster in there for good measure.


Now I know these cupcakes aren't "cupcake shop" quality but they're cute, and the best part is that Ella and her brother Dakota helped me to make them which made them feel good! Elmo was made of vanilla cake and white frosting with red food coloring. His eyes are a small, white marshmallow cut in half with a mini chocolate chip for the blacks of the eye. Finally, the finishing touch is a orange, tangerine flavored Jelly Belly Jelly Bean for the nose. Cookie Monster was made with a german chocolate cake mix and a homemade coconut topping with blue food coloring added. His eyes were made the same as Elmo's and he had Mini Chips Ahoy Cookies shoved in his mouth. Both cupcakes were a hit with adults and kids alike!

I wanted to do a party favor that kids and adults would be happy to take home. I did a variation of something I saw Martha Stewart do on "The View" for Whoopi's birthday. First, I took pretty scrapbooking paper and glued two to each other, print side out. Then I used the Martha Stewart Circle Cutter to cut out circles in the paper that were 5 inches in diameter. Now you could probably use a cup or something just as easily to cut out your circles. I just happened to have a coupon for 40% off at Michael's. Next, I printed out photos of  the birthday boy and girl from the past year. I used photos of the kids pictured with the other kids and adults that would be at the party. I then cut the pictures into circles with a 3 inch diameter. I wanted some way for the guests to remember what the occasion was and what year, so I used Avery address labels and added the date and occasion to the labels. It still didn't quite seem "finished" to me. I was planning on using the circles to attach to helium balloons that would float so it only seemed appropriate to find some sort of balloon quote. After a quick Google search, I found the perfect quote.


"No one can be uncheered with a balloon."
                                         - Winnie the Pooh


I then printed off the labels, stuck them on one side of the balloon and the picture on the other. I laminated the pieces, punched out a hole for the balloon string and the project was complete!

Everyone had a blast searching for their balloon with a photo of them with the birthday boy or girl.


Tip... when doing this project if you are worried about finding pictures of everyone, search Facebook! If you don't have a picture, maybe they will. You can then save it to your computer and print it out.